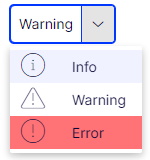
In one of my previous articles I described new Color Picker widget. Today I’d like to show another simple property. I prepared extended version of the SelectOneAttribute. This extensions allows developers to configure SelectionFactory, that returns items with icons and CSS classess. This allows us to visually emphasize the importance of values in the list, for example, by giving a different background color or icon. I haven’t prepared nuget package, because there are just few files that have to be copied to the solution.

First we need to add an extended version of SelectOneAttribute. The new atrubute uses for list items an instance of the ExtendedSelectItem class, which adds new fields to the menu list. Those information are send to client editor
|
1 2 3 4 5 6 7 8 9 10 11 12 13 14 15 16 17 18 19 20 21 22 23 24 25 26 27 28 29 30 31 32 33 34 35 36 37 38 39 40 41 42 43 |
[AttributeUsage(AttributeTargets.Property, AllowMultiple = false)] public class ExtendedSelectOneAttribute : Attribute, IDisplayMetadataProvider { public virtual Type SelectionFactoryType { get; set; } private readonly IServiceProvider _serviceProvider; public ExtendedSelectOneAttribute() { _serviceProvider = ServiceLocator.Current.GetInstance<IServiceProvider>(); } public void CreateDisplayMetadata(DisplayMetadataProviderContext context) { var extendedMetadata = context.DisplayMetadata.AdditionalValues[ExtendedMetadata.ExtendedMetadataDisplayKey] as ExtendedMetadata; if (extendedMetadata == null) { return; } var originalFactory = new SelectOneAttribute { SelectionFactoryType = this.SelectionFactoryType }; originalFactory.CreateDisplayMetadata(context); var selectionFactory = (ISelectionFactory)ActivatorUtilities.CreateInstance(_serviceProvider, this.SelectionFactoryType); extendedMetadata.EditorConfiguration["extendedSelection"] = selectionFactory.GetSelections(extendedMetadata).ToList() .OfType<ExtendedSelectItem>() .Select(x => new { x.Text, x.Value, x.Class, x.IconClass }); extendedMetadata.ClientEditingClass = "alloy/Editors/ExtendedSelectionEditor"; } } |
Below is an extended SelectItem
|
1 2 3 4 5 6 |
public class ExtendedSelectItem: SelectItem { public string Class { get; set; } public string IconClass { get; set; } } |
The next step is to create an editor. In fact, it is just an extension of the standard widget used to display the list. An icon and a class are added for each menu item.
|
1 2 3 4 5 6 7 8 9 10 11 12 13 14 15 16 17 18 19 20 21 22 23 24 25 26 27 28 29 30 31 32 33 34 35 36 |
define([ "dojo/_base/declare", "epi-cms/contentediting/editors/SelectionEditor", "xstyle/css!./ExtendedSelectionEditor.css" ], function( declare, SelectionEditor ) { return declare([SelectionEditor], { openDropDown: function () { this.dropDown.domNode.classList.toggle("select-with-icons", true); this.dropDown.domNode.classList.toggle(this.name, true); this.inherited(arguments); }, _getMenuItemForOption: function (option) { var menuItem = this.inherited(arguments); if (this.params.extendedSelection) { var customOption = this.params.extendedSelection.find(function (x) { return x.value === option.value }); if (customOption) { if (customOption.iconClass) { menuItem.set("iconClass", customOption.iconClass); } if (customOption["class"]) { menuItem.set("class", customOption["class"]); } } } return menuItem; } }); }); |
and few styles used to show icons:
|
1 2 3 4 5 6 7 |
.Sleek .select-with-icons.dijitSelectMenu td.dijitMenuItemIconCell { display: inherit; } .Sleek .select-with-icons.dijitSelectMenu td .dijitInline.dijitMenuItemIcon { display: inline-block; } |
Editor javascript and styles have to be copied to site client resources directory which depends on configuration. Usually it’s “ClientResources/Scripts/Editors” folder.
Code, together with an example is available as github gist

