In EpiServer 7.5+ you can create a custom view in Edit Mode. This is a powerful extension point to enhance the user experience. With few lines of code we are able to display the Content in a specific way. One of the built-in views is “All properties” view which allow to edit the form properties.
In this post I’ll show you how to extend “All properties” view and to create dependencies between the form properties.
This article is meant as a tutorial – I try to explain what has to be done step by step. The full implementation can be found at the bottom of the page.
Let’s start
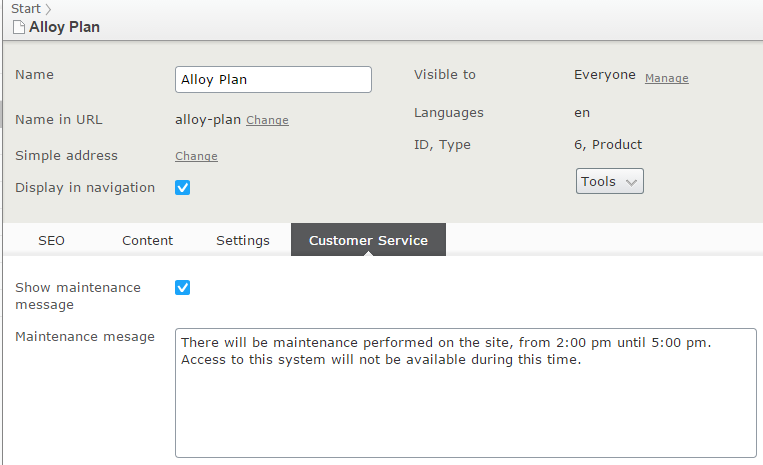
To prepare the sample I will use AlloyTech template project which is a good start for our development. Let’s assume that we need to add an additional text field MaintenanceMessage to the ProductPage type. This field will be used to display an alert at the top of the product page. The visibility of the field should be controlled by boolean ShowMaintenanceMessage field represented by a checkbox widget. The editor should only be able to fill the message if the checkbox is checked. Otherwise the MaintenanceMessage textbox should be readonly.
Here is the model class:
|
1 2 3 4 5 6 7 8 9 10 11 12 13 |
public class ProductPage : StandardPage { [Display(Name = "Show maintenance message", GroupName = "Customer Service", Order = 100)] public virtual bool ShowMaintenanceMessage { get; set; } [Display(Name = "Maintenance mesage", GroupName = "Customer Service", Order = 110)] [UIHint(UIHint.LongString)] public virtual string MaintenanceMessage { get; set; } /* */ /* other fields here */ /* */ } |
And finally the page preview.

Creating a new view
First we need to create a new custom view class. The class has to derive from ViewConfiguration and has to be decorated with ServiceConfiguration attribute. It also requires a unique key used for locating the view. Other options like icon, description, controller, etc. are not mandatory. They are described in many online examples and we will not focus on them in this scenario.
|
1 2 3 4 5 6 7 8 9 |
[ServiceConfiguration(typeof(ViewConfiguration))] public class ExtendedFormView : ViewConfiguration { public ExtendedFormView() { Key = "extended-formview"; //... } } |
In our case we will not derive directly from ViewConfiguration, because we don’t want to create a new view from scratch. Instead, we will set the base class to FormEditing.
The FormEditing extends ViewConfiguration class. Most of settings were already defined in the base type, so we just need to set a new unique key and also limit the target model type to ProductPage. FormEditing is registired for all IContent models while we need only one specific content type to be registered. That is why we had to changed the ForType property.
|
1 2 3 4 5 6 7 8 9 10 |
[ServiceConfiguration(typeof(ViewConfiguration))] public class ProductFormEditing : FormEditing { public ProductFormEditing() { Key = "extended-formview"; ForType = typeof (ProductPage); ViewType = "alloy.productFormEditing"; } } |
While ProductPageView is a backend side extension, the alloy.productFormEditing assigned in ViewType property is a frontend side extension. This is a dojo widget class that extends epi-cms/contentediting/FormEditing. I will show some details later.
Next, we need to prepare a new UIDescriptor for the Product content type. This class will be used to configure the behaviour of the content. We need to derive from generic UIDescriptor and decorate it with UIDescriptionRegistration attribute. Of course in our example the generic T is ProductPage.
|
1 2 3 4 5 6 7 8 9 10 |
[UIDescriptorRegistration] public class ProdcutDetailsUiDescriptor : UIDescriptor { public ProdcutDetailsUiDescriptor() : base(ContentTypeCssClassNames.Page) { this.DefaultView = "custom-formedit"; AddDisabledView(CmsViewNames.AllPropertiesView); } } |
In the code above I set “custom-formedit” as the default view and also remove the builtin “All properties” view from available page views. From this moment the Editor won’t see the original AllProperties view any more, but only the replaced version.
Modyfing dojo widget
The “alloy.productFormEditing” widget is a new client side view. Usually views inhert from “epi-cms/contentediting/_View” or from “epi‑cms/contentediting/EditingBase“. But our view extends FormEditing, so we will derive from “epi-cms/contentediting/FormEditing“.
The new widget uses two events from EditingBase:
- onFieldCreated – in this event we will collect all properties widgets as a dictionary. Using this collection we will be able to control properties behaviour
- onSetupEditModeComplete – this event is executed when edit mode is ready to use. We will implement dependencies between checkbox and textbox there (the _initMaintenanceMessage function)
|
1 2 3 4 5 6 7 8 9 10 11 12 13 14 15 16 17 18 19 20 21 22 23 24 25 26 27 28 |
define([ "dojo/_base/declare", "dojo/_base/lang", "epi-cms/contentediting/FormEditing" ], function( declare, lang, FormEditing ) { return declare("alloy.productFormEditing", [FormEditing], { widgetsList: {}, onSetupEditModeComplete: function() { this.inherited(arguments); this._initMaintenanceMessage(); }, _initMaintenanceMessage: function() { // TODO: implement dependencies between properties }, onFieldCreated: function(fieldName, widget) { this.inherited(arguments); this.widgetsList[fieldName] = widget; } }); }); |
Implementing dependencies between properties
The last thing to do is to implement the dependency between properties. This will be done in a separate function _initMaintenanceMessage. This function is executed after the Edit mode is created. From our widgetsList dictionary we get the maintenanceMessage and showMaintenanceMessages properties and subscribe to their change event. We also need to set textbox enabled initially. From now whenever the user toggles the checkbox, the text input will become enabled or disabled.
|
1 2 3 4 5 6 7 8 9 10 11 12 13 14 15 16 17 18 |
// ... _initMaintenanceMessage: function() { // get widgets var textWidget = this.widgetsList["maintenanceMessage"]; var checkboxWidget = this.widgetsList["showMaintenanceMessage"]; this.own(checkboxWidget.on("change", lang.hitch(this, function(value) { if (checkboxWidget.checkbox.get("readOnly")) { return; } textWidget.set("readOnly", !value); }))); if (checkboxWidget.checkbox.get("value") == false) { textWidget.set("readOnly", true); } }, // ... |
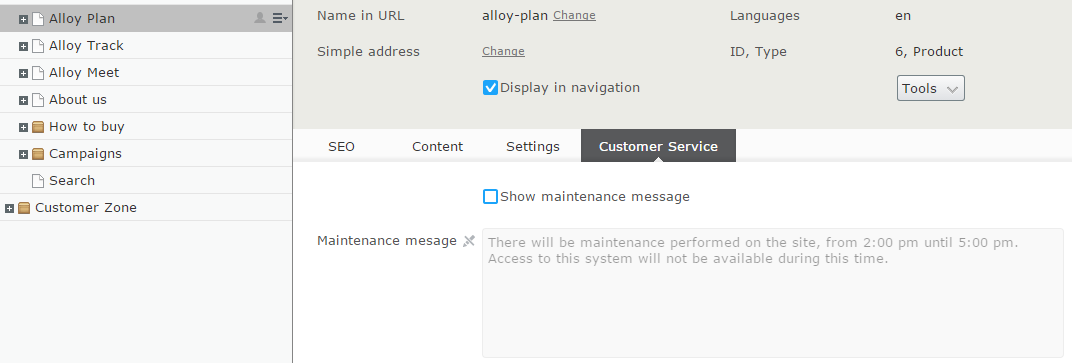
Now when user opens the form editing widget:
Full backend code:
|
1 2 3 4 5 6 7 8 9 10 11 12 13 14 15 16 17 18 19 20 21 22 23 24 |
namespace EpiServerThumbnail.Business.EditorDescriptors { [UIDescriptorRegistration] public class ProdcutDetailsUiDescriptor : UIDescriptor { public ProdcutDetailsUiDescriptor() : base(ContentTypeCssClassNames.Page) { this.DefaultView = "extended-formedit"; AddDisabledView(CmsViewNames.AllPropertiesView); } } [ServiceConfiguration(typeof(ViewConfiguration))] public class ProductFormEditing : FormEditing { public ProductFormEditing() { Key = "extended-formedit"; ForType = typeof (ProductPage); ViewType = "alloy.productFormEditing"; } } } |
And frontend code:
|
1 2 3 4 5 6 7 8 9 10 11 12 13 14 15 16 17 18 19 20 21 22 23 24 25 26 27 28 29 30 31 32 33 34 35 36 37 38 39 40 41 |
define([ "dojo/_base/declare", "dojo/_base/lang", "epi-cms/contentediting/FormEditing" ], function( declare, lang, FormEditing ) { return declare("alloy.productFormEditing", [FormEditing], { widgetsList: {}, onSetupEditModeComplete: function() { this.inherited(arguments); this._initMaintenanceMessage(); }, _initMaintenanceMessage: function() { // get widgets var textWidget = this.widgetsList["maintenanceMessage"]; var checkboxWidget = this.widgetsList["showMaintenanceMessage"]; this.own(checkboxWidget.on("change", lang.hitch(this, function(value) { if (checkboxWidget.checkbox.get("readOnly")) { return; } textWidget.set("readOnly", !value); }))); if (checkboxWidget.checkbox.get("value") == false) { textWidget.set("readOnly", true); } }, onFieldCreated: function(fieldName, widget) { this.inherited(arguments); this.widgetsList[fieldName] = widget; } }); }); |
As you can see there is only about 100 lines of code in order to get this interesting UI effect.